I'll just get this out right now, I love Live USB drives. Yes, and if you don't yet, you will. What fills an entire CD, only fills 17% of a 4GB thumb drive (8% of an 8GB, 4% of a 16GB, 2% of a 32GB, and so on). And you don't have to throw them away when you're done using them or if they're outdated, you just reinstall.
In contrast to Live CDs, the data contained on a Live USB can be changed and additional data can be stored on the same device (this is called "persistence"). You can carry your favorite operating system, applications, configuration, and personal files with you, making it easy to share a single system between multiple people. Programs also start faster and run better from a USB flash drive than from a Live CD.
How-To:
To make a Live USB all you need is a drive, the tools, and a LiveCD ISO image file, in fact you may even use a LiveDVD ISO image file as well. Many people still don't have DVD burners, so making Live USB drives is really great for those people. Later I will tell you how you can avoid doing any of this work and still get a Live USB.
Let me first introduce the tools for making bootable Live USB drives: There's USB Creator, Live Magic, and -- my favorite -- UNetbootin. There are others, but I've never used them. Other tools include gParted for partitioning, and a text editor for editing configurations.
USB Creator is used on Ubuntu (comes pre-installed I believe), and it's available for Fedora as well, but it is not available in the Debian repositories -- it is easy enough to install it from the Ubuntu repositories. UNetbootin is available in the Debian, Ubuntu, and Fedora, repositories.
Partitioning:
Step 1, make sure nothing you might want is still on the drive. In gParted you're going to first select the drive you want to format, this could easily be "/dev/sdc", second click "Device" then "Create Partition Table..." then click "Advanced" and set partition table type to "msdos" (this will ERASE all data on the drive, you will be warned.) The entire drive should be "unallocated" now.
Right click the "unallocated" partition, go to "Format to" and click "fat32" (unfortunately the FAT filesystem is the only one that has a large range of support, any other filesystem will likely not allow you to boot from the drive.) Now you click "Apply" (the check mark) to actually format the drive.
Next you right click the newly formated FAT32 partition and click "Manage Flags" then select "boot" to make the drive bootable. And we're done partitioning.
In USB Creator:
USB Creator is -- arguably -- the "easiest" way of installing a GNU/Linux distribution to a USB Drive.
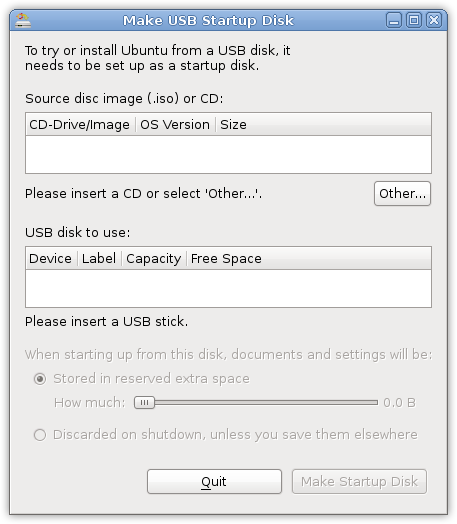
Step 1. In USB Creator what you do is insert a CD or select 'Other' to use an ISO image file on your hard drive, we're going with the latter. So select your file.
Step 2. Select your drive (or "USB disk").
Step 3 -- and this is where Ubuntu's "user-friendliness" comes in -- you now select "how much" "reserved extra space" you want for "storing your documents and settings". By this it means "persistence" a file or partition on the drive that holds the files you added to the drive and the changes you make to files and configurations while booted from the drive, without "persistence" all changes you make are lost when you reboot, just like on a LiveCD. So select "how much" you want or select "Discard on shutdown, unless you save them elsewhere".
Lastly, you click "Make Startup Disk". It should display a little window showing its progress, and finish without any problems. You may then reboot your computer with the USB in and boot the distribution.
There is, however, the possibility of not even getting past Step 1, because it was developed for Ubuntu this software it seems only works with Debian, Ubuntu, and Fedora (and a couple others), the fact is, it doesn't work for a large number of LiveCDs (I couldn't even get "Damn Small Linux" to install with USB Creator).
In UNetbootin:
UNetbootin has built-in support for 25 distributions, Debian, Ubuntu, Fedora, Gentoo, all included, 32 and 64 bit, there is hardly a need to download ISO image files.
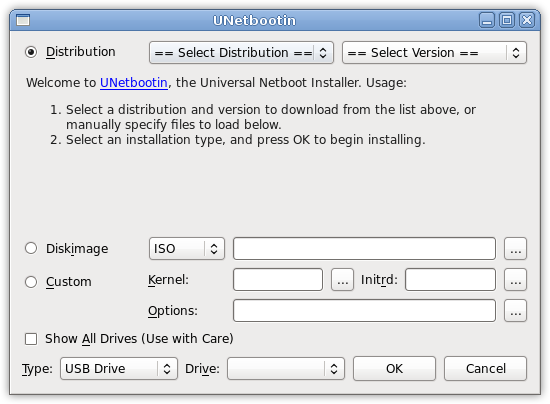
The UNetbootin interface is really self-explanatory. If you want UNetbootin to download and install a distribution to your drive automatically, you select "Distribution" (default) then select the distribution you want from the drop-down menu labeled "== Select Distribution ==" and select the distribution's version and architecture from the drop-down menu labeled "== Select Version ==".
If you want to use your own ISO image file select "Diskimage" then click on the ellipsis ("...") and select your file, it may be an ISO or a "Floppy". You even have the option of installing a custom Live USB distribution, by selecting "Custom" and choosing your Kernel, Initrd, and boot options.
Lastly, you select what type of drive it is before installing the system to the drive by selecting "USB Drive" or "Hard Disk" from the drop-down menu next to "Type" then you choose the drive you want to install the system to. UNetbootin only shows USB drives when "USB Drive" is selected, unless you check "Show All Drives (Use with Care)". And UNetbootin only shows hard drives when "Hard Disk" is selected.
And just click "OK" and you're done, UNetbootin will start to either download and install or go straight to installing the system to your drive, depending on whether you selected "Distribution" or "Diskimage".
"Persistence" in UNetbootin:
UNetbootin doesn't handle USB drive "persistence" (where changes are kept). In order to get a "persistent" Live USB system using UNetbootin you must do it by hand. What's difficult about this is that different distributions do it differently, some don't even support it. So I'll just explain how to do it with a Debian Live system (this technique works for many distributions, including Ubuntu).
Step 1. Partition your drive so that there are two partitions, one being FAT32 and the other being EXT2 with "live-rw" as its label. Alternatively, you may use a file instead.
By using the "dd" command:
Then the "mkfs" command:
On Ubuntu, "live-rw" should be "casper-rw".
Step 2. Edit a file on the drive called "syslinux.cfg" (this file exists after installation) and edit the line starting with "append" by adding "persistent" (without quotes) to the end of that line. It should read something like this:
You can also change this at boot time by pressing 't' at the boot menu.
I Can't Do All This:
Want to skip all this work? Fortunately you can just buy a Live USB drive. Yep, with GNU/Linux and everything, Debian, Ubuntu, Fedora, Arch, Gentoo, even BackTrack, Damn Small Linux, FreeBSD. Pretty much everything that UNetbootin can install, you can just buy pre-installed on a USB Drive.
Where at?
*Not Sponsored* Drives are available in 2 gigabytes ($19.99), 4 gigabytes ($24.99), 8 gigabytes ($34.99), 16 gigabytes ($48.99), 32 gigabytes ($75.99), and 64 gigabytes ($179.99). You can even select User Interface, Architecture, FileSystem, and if you need some more software installed on the thing, you can have that too.